
Most PrestaShop store owners working with suppliers go through the same routine every week. The supplier sends a file. You download it. You log into the back office, navigate to the import section, upload the file, map the columns, run the import, check what failed, and start again next week. If you have three suppliers, you do this three times. That is not a workflow. It is an inefficient cycle that consumes hours every week. The good news is that the entire cycle from file retrieval, import, notification, to cleanup, can run automatically once it is set up properly. This guide walks through exactly how to do it using the Knowband PrestaShop Import Export Module, with no developer involvement at any step.
What Automated Supplier Import Actually Means
Before getting into the steps, it helps to be clear on what automated means here.
Most store owners think automating supplier import means the import runs on a schedule. That is part of it. The full picture is:
- The module connects to your supplier’s FTP server at a set time.
- Downloads the latest product file automatically.
- Maps the columns to your PrestaShop fields using a saved configuration.
- Runs the import and updates prices, stock, and product data.
- Sends you a completion email with the record count and any errors.
- Removes the local file copy after a set number of days.
You set this up once. After that, it runs without you.
What You Need Before Starting
- The Knowband PrestaShop Import Export Module is installed on your store.
- Your supplier’s FTP or SFTP server credentials (host, port, username, password, file path).
- One sample of the supplier’s product file (CSV or XML is most common).
- Access to your server’s cron manager or PrestaShop’s Scheduled Tasks module.
If your supplier does not offer FTP access and only sends files by email, the automated FTP pull will not apply. You can still save the import profile and run it manually in seconds rather than rebuilding the configuration each time, which still cuts the process significantly.
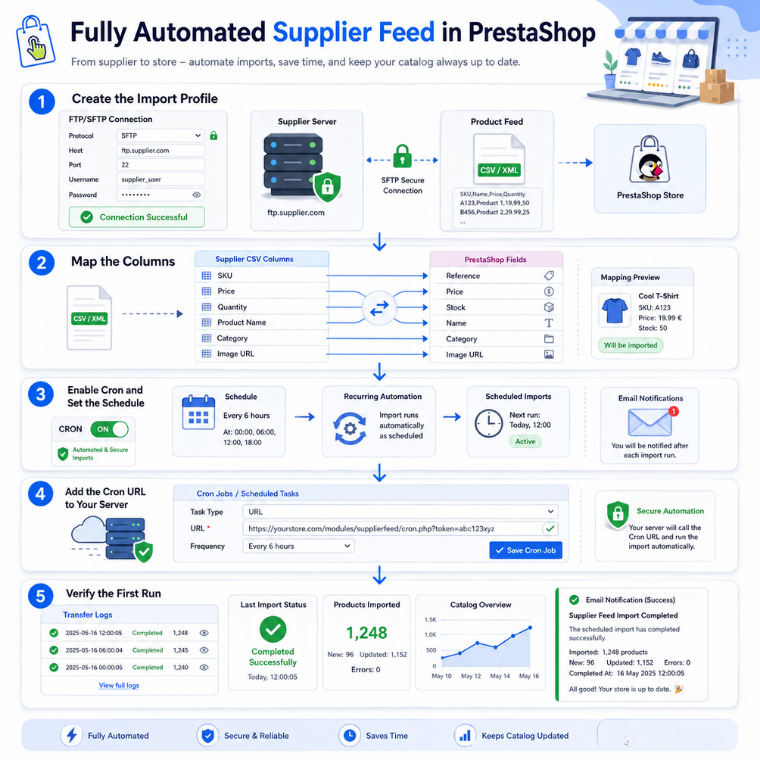
Step 1: Create the Import Profile
Open the PrestaShop Import Export Module and go to the Import tab. Click Add Import Profile and give it a descriptive name, something like Supplier A Weekly CSV or Brand Feed Friday.
Set the Data Type to Products and choose the file format your supplier uses. CSV is the most common for supplier feeds. XML is common for larger wholesalers and ERP systems.
Under Pick Source, select FTP / SFTP. This is what makes the automation possible. Upload source profiles are manual-only; they cannot be cron-driven. An FTP source is required for any profile that needs to run unattended.
Enter your supplier’s connection details:
- Transfer Protocol: FTP for standard connections, SFTP for encrypted ones
- Server: your supplier’s FTP address
- Port: 21 for FTP, 22 for SFTP
- Username and Password: the credentials your supplier provided
- Remote File Path: the exact path to the product file on their server
Click Test Connection before moving on. The module connects to the server live and confirms whether the credentials work and the file path is readable. Fix any issues here rather than discovering them on the first automated run.
Step 2: Map the Columns
Click Next Step. The module fetches the first rows of your supplier’s file and displays them alongside the PrestaShop field names. This is the column mapping screen.
The module auto-matches common header variations; most standard supplier files will have a large portion of columns matched automatically. Review the pre-filled mapping, correct anything that looks wrong, and assign any columns that were not matched.
For a basic PrestaShop CSV import covering prices and stock, the minimum columns needed are Reference, Price, and Quantity. Map those correctly, and the import will update the right products without touching anything else.
If your supplier uses a format that you will receive again in the same structure every week, the mapping is saved with the profile. You will never remap these columns again.
For PrestaShop bulk product import covering new products, descriptions, images, and combinations, you will want to map more fields. Take the time to get this right on the first run; every automated run after that uses the same saved mapping.
Step 3: Enable Cron and Set the Schedule
Scroll down to the Scheduling section inside the same profile. Toggle CRON to On.
When cron is enabled and an email address is configured, the module sends a completion notification after each run. The email includes the number of records processed, how many succeeded, how many failed, and a specific reason for any failures. You get a full picture of every automated run without logging into the back office.
Save the profile.
Now open General Settings and go to the Scheduled Cleanup section. You will see three cron URLs: one for export profiles, one for import profiles, and one for file cleanup. Copy the Import Profiles cron URL.
Step 4: Add the Cron URL to Your Server
Paste the copied URL into your server’s cron manager. If you do not have direct server access, use PrestaShop’s built-in Scheduled Tasks module under Advanced Parameters.
Set the interval to match your supplier’s update frequency. If your supplier refreshes their file every Monday morning, set the cron to run on Monday at 6 AM. If they update daily, set it to run daily.
The cron URL contains a secure token generated by the module. It is safe to use in a server cron manager without exposing any admin credentials.
Step 5: Verify the First Run
After the first scheduled execution, open the Transfer Logs tab. A new entry will appear for the import run showing the date, file name, status, and record count. If the status shows completed and the record count looks right, the automation is working correctly.
If anything failed, the log entry shows row-level error detail. Each failed row displays the row number from the supplier file and a specific error message. Fix the affected rows in a manual version of the file if needed, and the next scheduled run will process the corrected data automatically once the supplier updates their feed.
What the Workflow Looks Like Once the PrestaShop Import Export Module Is Running
Every week at the scheduled time, the Knowband PrestaShop Import Export Module connects to your supplier’s FTP server, downloads the latest product file, runs the import using the saved column mapping, updates prices and stock across the matched products, sends you a completion email, and removes the local file copy after seven days.
Your involvement is zero. The store stays current with supplier data. And the time that used to go into the weekly manual PrestaShop bulk product import now goes elsewhere.
If you work with multiple suppliers, create a separate profile for each one. Each profile runs on its own schedule, pulls from its own FTP location, and reports separately. Ten suppliers means ten profiles, set up once, running independently every week.
Common Issues and How to Avoid Them
Connection test passes, but the cron fails to pull the file: Confirm your server allows outbound connections on port 21 or 22. Some shared hosting providers block FTP outbound by default. Contact your host to confirm.
Prices update, but stock does not: Check that the Quantity column is mapped in the import profile. If it is left unmapped, the module skips it intentionally, and stock stays unchanged.
New products appear with zero stock: Your supplier file likely does not include a Quantity column for new products. Add a default value or ask your supplier to include stock in their feed.
The import runs, but no email arrives: Confirm the email notification is toggled on inside the profile and that your PrestaShop SMTP settings are configured correctly under Advanced Parameters.
Once this is running, the manual PrestaShop CSV import cycle is gone. The data comes in on its own, the errors surface in a notification rather than a surprise, and the only time you look at the import is when something needs attention. That is what automated actually means. Set up your first automated supplier profile with the Knowband PrestaShop Import Export Module now.
For more such reads, you can visit:

